Throughout This Page
You can jump to the specified sections by clicking on these titles.
Orders
There are three ways of importing orders into your system.
Via Sales Channels
When you connect your sales channels to the system, it will automatically retrieve any orders that were created after the channel was installed. Although it typically takes only a few minutes for the orders to appear, it could sometimes take up to an hour.
Moreover, the system will regularly check each connected sales channel for paid and unshipped orders. The status of the imported orders will depend on the sales channel, and they may appear as "unshipped," "pending," "processing," or other similar statuses on their respective platforms.
Manual Input
For manual input, you have two options: "Send a Parcel" and "Create Order." The former is suitable for quickly entering shipment details and generating a label. In contrast, "Create Order" allows you to create and save an order without immediately despatching it.
While the "Send a Parcel" option is faster than the "Create Order" page, which is more comprehensive and recommended for international orders due to the additional information required. Both options will save the order, but "Send a Parcel" only keeps it if the label is successfully generated.
To access the "Send a Parcel" page, click on it in the left-hand menu. On the other hand, you can find the "Create Order" button right down below it.

Processing Orders / Label Printing
Send a Parcel
A one-off shipment is the fastest option if you need to generate a label for a single order quickly. To initiate this process, click the "Send a Parcel" button on the left-hand menu. It will enable you to create a label for your shipment without any additional steps or processes.

When you access the order details page, the first field is the "Products" section, positioned from the top-left to bottom-right. In this section, you can view all the products attached to the order and their corresponding image thumbnails, descriptions, and prices. The item's country of origin and HS codes will also be displayed for international orders. All of this information is sourced from the inventory you've added to the order, and it serves as a comprehensive overview of the products included in the shipment.
If you accidentally add the wrong products to an order, you can easily remove them by clicking the "Clear Products" button. To add a new product to the order, click "Add Product," which will open a window to search for a product in your inventory or manually enter the product information.

Immediately below the "Products" section, you'll find the "Boxes" section, a crucial part of the order details page. In this section, you can input necessary information about the packaging, including the parcel's weight and dimensions (X x Y x Z, or Length x Width x Height). If multiple parcels exist for the order or shipment, you can add additional boxes by clicking the "Add Box" button. Packaging presets are also available in the drop-down menu, such as "Large Letter 750g," which automatically inputs the weight as 0.750 and the dimensions as 35 x 25 x 2.5. You can find more detailed explanations of the packaging templates on this page. The weights and dimensions in inventory will automatically appear in the respective fields and populate the Boxes section if the customer has them available.
For the weight to be automatically populated after selecting a preset packaging type, navigate to the "Settings" menu and select "Packing Templates." From there, you should turn on the optional "(Total Order Weight)" feature for the template you want to use. Once this feature is enabled, the order weight will be automatically filled in for you when you select the corresponding packaging preset on the order details page.

Moving to the top-right corner, you'll find the "Scan Order" field. If the order you need to process is already in the system, you can copy-paste the order or print reference number into this field to search for it manually. It will automatically populate most areas on the order details page, including customer information, shipping address, and products.
Additionally, if you've printed an invoice for the order, you can use a barcode scanner to "scan" the barcode on the invoice or packing sheet. It quickly auto-populates all the necessary fields, saving you time and effort.
Here is an example of searching for an order using the order reference number.

Directly below the "Scan Order" field, you'll find the "Sales Channel" section. This feature is handy for manual orders created from scratch, allowing you to assign them to a sales channel other than the default "Manual" channel. By selecting the appropriate sales channel for the order, you can keep track of its origin and ensure that it is accurately accounted for in your sales data. This is where you can also find out where the order came from if it was received from a sales channel.

If you need to update the customer information or shipping address, you can do so through the "Shipping Details" section. To access this section, click on the "Edit Details" button, which is located below the customer and shipping information. From there, you can make the necessary changes to the details and ensure the order is shipped to the correct location.

The "Customer Information" section includes relevant details about the customer, such as their name (or company name), email address, phone number, and more. For international shipments outside the UK, fields are available for the customer's VAT and EORI details. However, this information is only applicable to international orders. If the customer's information is already in your database. In that case, you can search for existing customers by using the "Find Customer" button and searching by company name, customer name, or email address.
In the "Shipping Address" section, you input the address where the shipment will be delivered. You can start by simply entering the postcode, and a drop-down menu will appear with a list of matching addresses to choose from. Once you select the correct address, the rest of the details will automatically be populated.
It's important to note that the postcode search feature is only valid for addresses within the UK. Additionally, each time you successfully select an address using this feature, it will decrease your postcode lookup credit by one. Therefore, it's essential to use this feature carefully and only when necessary to avoid running out of credits.

At the bottom right of the page, you'll find the "Shipping Service" section, which allows you to select the shipping service for the order from a dropdown list. The shipping service can be automatically assigned based on a set of shipping rules that you've configured. Once you select a shipping service and click the "Create Single Shipment" button, it will generate the shipping label for the order.

All Orders
To display your orders, click "Orders" in the left panel. Once you're on the Orders page, you'll see the first section, a search bar. You can use this search bar to filter your orders based on their related information by checking the checkboxes below it. Additionally, you can click on the "Filters" button to reveal more details, which will help you limit your search.

You'll notice that all boxes except the "Item QTY" have a drop-down menu. These drop-down menus contain all the information you need, and you can scroll through them to find the option you want to select.
You can save your current filter search by clicking the "Save" button next to the search bar. Once you save your filter search, you can access it later by clicking on the "Saved" tab in the top-right corner of the page. This way, you can quickly apply your favourite filter search without setting it up again.

After the search bar and filter options, you'll see a list of all your orders below. Each order is displayed in a row, and you can find all the relevant information about it, such as the order date, the customer's name, and the order status.
On the right side of each row, you'll see three action buttons that allow you to perform various tasks in that order.

If you need to print invoices for multiple orders simultaneously, you can select them using the checkboxes on the left side of each order row. Once you've chosen the orders you want to print, click on the "Print Orders" button at the bottom left of the page.
You'll notice that the bottom menu becomes visible upon selecting one or more orders. This menu allows you to print labels, export orders, and create invoices for the selected orders. Therefore, using this feature, you can print multiple labels simultaneously, saving time and effort.

You can use the bulk action feature if you need to process multiple orders at once. To do this, select the orders you want to process using the checkboxes on the left side of each order row.
After selecting the orders:
- Look for the drop-down menu at the page's bottom right side.
- From there, choose the action you want, such as marking the orders as shipped or cancelling them.
- Once you've selected the action, click on the "Apply Action" button, and the system will perform that action for all the orders you've selected.
This way, you can process multiple orders together and save time on repetitive tasks.

If you want to customize the columns displayed on the Orders page, you can use the three-dot button on the page's right side. Clicking on this button will open a drop-down menu that allows you to show or hide specific columns.
To show a column, check the box next to its name, and it will appear on your screen. To hide a column, uncheck the box next to its name, and it will disappear. By customizing the columns displayed on the Orders page, you can focus on the most critical information and improve your workflow.

Importing and Exporting Orders
You need to access the "Import/Export Orders" feature to import new orders. To do this, click on the "Orders" option on the page's left panel.
Once you're on the Orders page, look for the "Import/Export Orders" button and click on it. It will take you to the Import/Export page, where you can upload a CSV file containing your new orders.
From here, you can follow the instructions to import your new orders into the system, making managing your sales easier.

You can import new orders into the Orders page using a CSV file or a sales channel integration. To import orders using a CSV file, you'll see a button labelled "Upload & Process File." Clicking this button will open a file explorer to locate and upload your CSV file. An example CSV file is available on this page that you can use as a guide to help you organize your data correctly.
By clicking on the logo of the sales channel, such as Amazon or eBay, on this page, you can utilize their corresponding CSV column mapping if you manually import orders using the CSV file downloaded through their platform.
By importing your orders into the system, you can better manage your sales and streamline your order fulfilment process.
You can select whether to import orders directly into the batch process upon importing the CSV file by checking the "Load orders directly into batch process on import" option.

When you upload a CSV file to import new orders into the system, the left column of the Import/Export page will display the sections on the Orders page, and the right column will represent the data pulled from the CSV file.
To ensure that your data is imported correctly, you must match the fields of your CSV file with the corresponding fields in Orders. It means that the data from each column in your CSV file needs to be mapped to the correct area in the system.
If you don't have data for a particular row or field, you can leave it blank by selecting the first option, "---," in the corresponding drop-down menu.
By carefully mapping your CSV data to the correct fields in the system, you can ensure that your orders are imported accurately and that you can manage your sales effectively.

To make it easier to import orders using a CSV file, you can give the fields that you've matched an "Import Name" and save the mapping configuration. If you need to import orders again, the system will automatically fill out the fields using the saved mapping, saving you time and effort.
After you've mapped your data and submitted the CSV file, the system will load your orders, and you can begin processing them immediately on the redirected screen.
If you notice any mistakes or need to change your import settings, you can view and revert your imports by selecting the "Today's Imports" tab on the top right-hand side of the Import/Export page. From there, you can easily undo any imports that were made in error or modify your settings to ensure that future imports are accurate and complete.
When you want to rollback an import, you can click on the specific import you wish to undo and then select the "Rollback Selected Imports" button. Afterwards, the system will delete all the changes you've made for that particular import, and you'll see a message on the screen confirming that the rollback was successful.


To export your orders, you can select a specific date range and filter your orders based on their statuses to generate a detailed CSV report file. Once selected, click the "Download Report" button to initiate the export process. The report file will be automatically downloaded to your designated download path, and you can use it to view and analyse your order data as needed.

Batching
Batching is helpful if you need to generate multiple labels at once. It allows you to create new labels while the batch is processed in the background. Additionally, a picking sheet will be generated that details the order ID, shipping address, and order item lines, as well as product codes and quantities (if selected) before printing.
To use the batching feature, you can select the orders you want to process (individually or all at once) and then click on the "Batch Process" button, which can be found on the "Orders" page.

On the "Processing Menu" on the top left side, a button labelled "Process Orders" will send all selected orders to be booked with their respective shipping services. Additionally, there is an option to enable "Create picking list with labels," which will print a picking list before each label instead of printing all labels together.
On the right side of the processing menu, there are "Bulk Assign Options," which allow you to set the same values for every selected order. For example, if you input "5" in the weight field and click "Set Weight," the weight value for every order chosen will be set to "5". This principle applies to "Set Packaging," "Value," and "Set Shipping Service" options as well. Remember to select the orders for these options to work. If you haven't configured any shipping rules, you'll have to manually choose the shipping service for every order in the batch.
Below is every order that was selected to be processed in this batch. The weight, value, dimensions, etc., can also be set here for each order. Additional pieces can also be added if the order requires multiple boxes.

After processing a batch, you will be directed to a separate page to view all your batches, including past ones. The batch status is displayed as "In Progress" in the screenshot provided. The time it takes to complete the batch depends on the number of labels within it and the speed at which the labels are retrieved from the courier(s) you selected.

Once the batch is finished, it will be marked with a green checkmark. However, an amber mark would appear instead if there were any errors during processing. If the batch fails, a red cross will be displayed.
You can access individual labels for each shipment by clicking on the batch number. If a particular shipment fails, the reason for the failure will be displayed.
The options on the right-hand side of the table allow you to retrieve the labels and reset them if necessary (e.g., if the wrong shipping service was selected for an order). Clicking "View Batch Labels (PDF)" will display the labels in a single PDF file, formatted for 4x6" labels. Other options, such as S17 and S19, are available with integrated label papers.
Cancelling & Resetting
The "Actions" button on the batch history page allows you to cancel or reset entire batch orders simultaneously. To access this page, click the "Batch History" button.
If you wish to cancel individual orders, you can do so by entering their despatch details. An example of this is shown below.

To locate an order's despatch details, go to the batch details and click on the "View Shipment" button. It will take you to a new page, where you should click "View Order" to access the order you want to process. From there, you can find the despatch details for that particular order.


To process an order individually, click on the "Despatch Details" tab and locate the "Cancel Label & Reset Order" button at the bottom of the page. Clicking on this button will allow you to cancel the label and reset the order for that particular shipment.

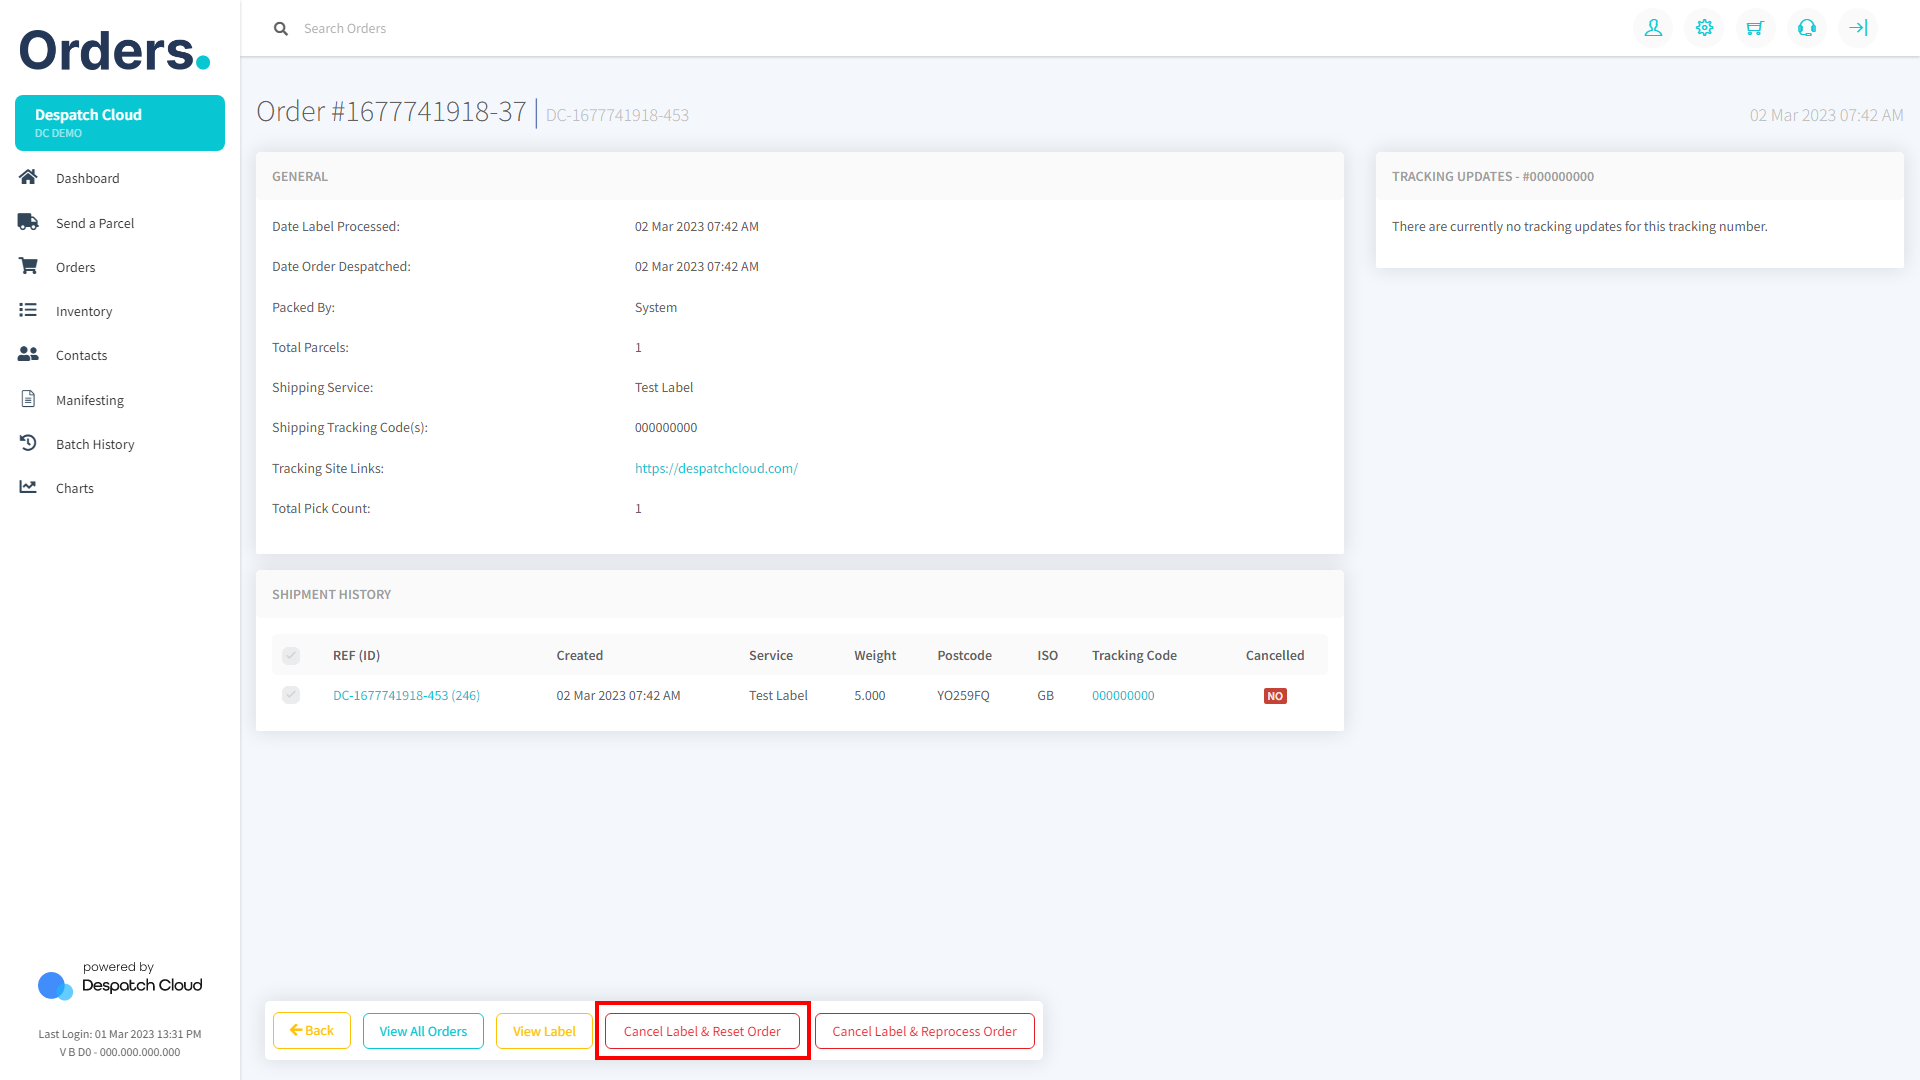
Resetting an individual order from the batch using the "Cancel Label & Reset Order" button will reset the order and attempt to cancel the label with the courier that the label was originally booked with, provided that the courier's API allows for label cancellations. It's important to note that if you reset the entire batch, the courier will also cancel the labels.