Throughout This Page
You can jump to the specified sections by clicking on these titles.
Navigating to the Inventory Imports/Exports Page
Click on the "Inventory" icon at the left-hand side of the screen. Then, select the "Imports/Exports" icon, as highlighted below.

Importing General Inventory
In the mapping tool, you can match the headers in your CSV file with the corresponding fields on our platform. It's crucial to ensure accurate mapping to guarantee the correctness of the imported data. If your file's headers align with our platform's expected headers, they will be automatically matched. You can download and examine a sample file provided for reference to review the default headers and their formatting here.
To experience how the inventory import function works, you can utilize a populated CSV file containing a few example inventory items. You can import 5 sample items directly into your inventory using this file. It will allow you to explore and understand the inventory management process more effectively. Upload the CSV file with the example inventory, and the items will be imported, providing you with a hands-on experience with the inventory importing feature.
Hands-on experience: Try the inventory import function with a populated CSV file containing example inventory items. Import 5 sample items directly into your inventory to gain a hands-on experience with the process. This practice will enhance your understanding of inventory management using the import feature.
When importing inventory, you can map the following fields with their corresponding explanations:
| Compulsory Header | Header | Header Description | Example Input |
| NO |
SKU |
The Stock Keeping Unit is a unique identifier for each product. | ABC-123 |
| YES | Name | The name of the product. | Product 1 |
|
YES |
Type (1: Inventory, 2: Component, 3: Group) |
The type of the item, whether it is a regular inventory item, a component used in the assembly of other products, or a product group. |
2
|
| NO |
Batching Type (0: No Batching, 2: Batch Numbers) |
Specifies if the item is batched and, if so, whether it uses batch numbers for tracking. | 0 |
| NO |
Serial Numbered (0: No, 1: Yes) |
Indicates if the item is serialized. If set to "Yes," the Batching Type is automatically updated to "No Batching." |
1 |
| NO | Image URL | The URL of the product's image. | https://host.website/pic.jpg |
| NO | Description | A detailed description of the product. | This is a detailed desc about the product. |
| NO | Cost Price | The cost price of the item. | 19.99 |
| NO |
Sync Stock (0: No, 1: Yes) |
Indicates whether the item's stock should be synchronized with sales channels. | 1 |
| NO | Unit Price | The selling price of a single unit of the product. | 49.50 |
| NO | Item Barcode | The primary barcode used for the product. | This text will be converted into a barcode. |
| NO | Item Barcode 2 to Item Barcode 5 | Additional barcodes for the product. | Same as above. |
| NO | Product Weight (Kg) | The weight of the product in kilograms. | 4.5 |
| NO | Product Height (cm) | The height of the product in centimeters. | 25 |
| NO | Product Width (cm) | The width of the product in centimeters. | 20.5 |
| NO | Product Length (cm) | The length of the product in centimeters. | 5.2 |
| NO | HS Code | The Harmonized System (HS) code for the product. |
8543400000
|
| NO | Country of Origin | The country of origin for the product. Must be written as an Alpha-2 code. | GB |
| NO | Customs Description | A brief description of the product for customs purposes. | Short customs description. |
| NO | Inventory ID | The unique ID assigned to the inventory item. | 00001 |
| NO |
Dynamic Components Type (1: Enabled, 0: Disabled) |
Indicates if dynamic components are enabled for the product. | 0 |
| NO |
Include Assembly Stock Level (1: Enabled, 0: Disabled) |
Specifies if the stock level of assembled products should be included. | 0 |
| NO | Service Option | Additional service options associated with the product. | Name of the service. |
| NO | Fabric Content | The fabric content or material used in the product. | A text box where you can define the materials. |
| NO | Global Stock Warning Level | The global stock warning level for the product. | 20 |
| NO |
Drop Shipping Type (1: Enabled, 0: Disabled) |
Indicates if drop shipping is enabled for the product. | 0 |
| NO |
Default VAT Rate Percentage (0, 5, 10, 17.5, 20, 100) |
The default VAT rate percentage for the product. | 17.5 |
| NO |
Inventory Archive Status (1: Enabled, 0: Disabled) |
The inventory item's archive status, whether archived or not. | 0 |
After mapping the fields from the CSV file to the platform, click the "Submit Mapped Data" button at the bottom of the page.
If you have created any custom fields, they will also be listed in the mapping section at the bottom. For more information on custom fields, please refer to this page. You can input numbers directly for numeric custom fields, while for text fields, the CSV file import will only accept text input. Follow these guidelines when working with your custom fields to ensure smooth data handling.
Upon clicking the button, you will be directed to a page where you can monitor the import progress, including the number of inventory items imported and the current status of the import. Once the import is complete, you will see the message "All chunks are processed." At this point, you can return to the inventory by clicking the button on the left side.
All imported inventory will now be visible. If you click the edit button on the right side of any entry, you can access detailed information for the imported inventory and make any necessary further changes.
Accurate mapping: In the mapping tool, match the headers in your CSV file with the corresponding fields on our platform. Double-check the mapping to guarantee the correctness of the imported data. Utilize the provided sample file for reference and review the default headers for better understanding.
Importing Move Stock Location
The "Move Stock Location" feature enables you to efficiently manage and transfer inventory from one location to another within your warehouse.
Utilizing this functionality can streamline your stock management process and ensure that products are stored in the most appropriate locations based on demand, storage capacity, or other factors. It proves especially useful for optimizing inventory distribution and maintaining accurate stock records.
Choose the "Move Stock Location" import type in the designated section to begin the import process. Here is an empty file containing all the necessary headers to facilitate your customisation. Fill in the required details according to your specific needs.
Below is an explanation of the headers that should be included in the move stock location CSV file:
| Compulsory Header | Header | Header Description | Example Input |
|
YES |
SKU | The unique identifier for each product (Stock Keeping Unit) must be moved. | SKU-123 |
|
YES |
Source Location ID |
This field refers to the unique identifier (ID) of the current location from which you want to move the stock. The source location ID is in the "Locations" section under the "Warehouse" section. |
5 |
|
YES |
Target Location ID |
The unique identifier (ID) of the destination location to which the stock will be transferred. | 2 |
|
YES |
Quantity |
This field indicates the quantity of the SKU you intend to move from the source to the target location. | 20 |
|
NO |
Notes |
This field allows you to add any relevant information or remarks regarding the stock movement, providing additional context or details for reference. | Optional field for adding relevant notes or remarks related to the stock movement. |
After mapping the fields from the CSV file to the platform, click the "Submit Mapped Data" button at the bottom of the page to complete the process.
Importing Relationships
The relationship CSV file import feature is crucial in organising inventory data and applies to both group and normal inventory items. In this context, a "group" refers to a collection of linked inventory items, allowing for better organisation and management.
The primary SKU is the unique identifier for the group, while the secondary SKU represents a normal inventory item associated with the group. The quantity listed in the relationship file corresponds to the quantity of the secondary SKU, further enhancing the inventory organisation.
Choose the "Relationships" import type in the designated section to begin the import process. We have provided an empty file containing all the necessary headers to facilitate your customisation. Fill in the required details according to your specific needs.
Below is an explanation of the headers that should be included in the relationship CSV file:
| Compulsory Header | Header | Header Description | Example Input |
| YES | Primary SKU | The unique identifier for the group inventory. | FSX-3050 |
| YES | Required Quantity |
The quantity of the secondary SKU (normal inventory item) that belongs to the group. |
20 |
| YES | Secondary SKU |
The unique identifier for the normal inventory item associated with the respective group. |
0001 |
| YES |
Packing Option (1: Assembled, 0: Ship as is) |
An indicator of how the items should be packed. To be shipped as it is or assembled with other products. |
0 |
After mapping the fields from the CSV file to the platform, click the "Submit Mapped Data" button at the bottom of the page to complete the process.
Importing Inventory Categories
The import feature for inventory categories provides a convenient way to create and manage categories for your inventory items.
Categories help organise and classify products, making locating, tracking, and analysing inventory data easier. Using this import functionality, you can efficiently assign inventory items to specific categories, ensuring a well-structured inventory management system.
Choose the "Inventory Categories" import type in the designated section to begin the import process. Here is an empty file containing all the necessary headers to facilitate your customisation. Fill in the required details according to your specific needs.
Below is an explanation of the headers that should be included in the inventory categories CSV file:
| Compulsory Header | Header | Header Description | Example Input |
| YES | Inventory SKU | It represents the unique identifier for each product in your inventory, known as the Stock Keeping Unit (SKU). Each SKU corresponds to an individual item. | SKU-123 |
| YES | Category Name | It contains the name of the inventory category to which you want to assign the specific SKU. This name should match exactly with the existing inventory categories in your system. | An Example Category Name |
Before proceeding with the CSV file import for inventory categories, it is essential to ensure that you must create the categories within the system. You can do this through the "Settings -> Inventory Categories" section. The import process will only succeed if the categories listed in the import file match the system's existing inventory categories. Proper creation of categories is mandatory to facilitate successful mapping during the import process and effectively associate inventory items with their respective categories.
After mapping the fields from the CSV file to the platform, click the "Submit Mapped Data" button at the bottom of the page to complete the process.
Importing Stock Levels
The CSV file import feature for stock levels allows you to efficiently update and manage stock quantities for specific products in your inventory. This functionality will enable you to easily adjust the stock levels for various SKUs, ensuring accurate and up-to-date information about available stock quantities.
Choose the "Stock Levels" import type in the designated section to begin the import process. Here is an empty file containing all the necessary headers to facilitate your customisation. Fill in the required details according to your specific needs.
Below is an explanation of the headers that should be included in the stock levels CSV file:
| Compulsory Header | Header | Header Description | Example Input |
| YES | SKU | The unique identifier for each product (Stock Keeping Unit) for which the stock levels are updated. | SKU-123 |
| YES | Location ID | The unique identifier (ID) of the storage location where the stock level needs to be updated. The location ID is in the "Locations" section under the "Warehouse" section. | 4 |
| NO | Stock Level On Hand | The updated quantity of the SKU available in the specified location. | 20 |
| NO | Location Stock Warn Level | The threshold quantity for stock that triggers a warning or alert for reordering at the location. | 10 |
| NO | Location Max Stock Level | The maximum allowable quantity of the SKU at the given location to avoid overstocking. | 50 |
| NO | Priority | An optional field to assign priority levels to specific stock level updates. | 1 |
After mapping the fields from the CSV file to the platform, click the "Submit Mapped Data" button at the bottom of the page to complete the process.
Importing Supplier Relationships
The CSV file import feature for supplier connections empowers you to establish and manage associations between inventory entries and specific suppliers. This functionality seamlessly links inventory items to their respective suppliers, streamlining your procurement and supply chain processes.
Before importing supplier connections, it is imperative that the supplier already exists within the system. You can create a supplier through the "Contacts" page if it does not exist.
Choose the "Supplier Relationships" import type in the designated section to begin the import process. Here is an empty file containing all the necessary headers to facilitate your customisation. Fill in the required details according to your specific needs.
Below is an explanation of the headers that should be included in the supplier relationships CSV file:
| Compulsory Header | Header | Header Description | Example Input |
| YES | The email address of the supplier with whom the inventory item will be associated. | [email protected] | |
| YES | SKU | The unique identifier for each product (Stock Keeping Unit) that will be connected to the supplier. | SKU-123 |
| NO |
Supplier Reference |
A reference or identifier specific to the supplier for the corresponding SKU. | Supplier2436 |
| NO | Minimum Order Quantity | The minimum quantity that needs to be ordered from the supplier for the associated SKU. | 10 |
| NO | Cost Price | The price at which the SKU is acquired from the supplier. | 49.99 |
| YES |
Primary Supplier (1: Yes, 0: No) |
Specifies whether the supplier is the primary source for the SKU (e.g., "True" or "False"). | 1 |
| NO |
Active (1: Yes, 0: No) |
Indicates whether the supplier connection is active (e.g., "True" or "False"). | 1 |
After mapping the fields from the CSV file to the platform, click the "Submit Mapped Data" button at the bottom of the page to complete the process.
Importing Packaging Configurations
The packaging configurations feature allows you to manage and customise packaging information while despatching orders. You can override the default packaging details associated with specific products when importing packaging configurations. This functionality proves especially valuable when you must tailor packaging based on unique requirements for different orders or products.
When a packaging configuration is chosen, it overrides the dimensions and adds the weight on top of the product weight.
Choose the "Packaging Configurations" import type in the designated section to begin the import process. You can find an empty file containing all the necessary headers to facilitate your customisation. Fill in the required details according to your specific needs.
Below is an explanation of the headers that should be included in the packaging configurations CSV file:
| Compulsory Header | Header | Header Description | Example Input |
| NO | SKU | The SKU of the packaging entry for reference. | SKU-Demo1 |
| YES |
Type (1: PCS (Pieces), 2: Inner) (2: Inner, 3: Outer) (4: Carton, 5: Box) (6: Pallet, 7: Crate) (8: Container) |
The numeric representation of the box type (1 to 8) used for packaging. |
1 |
| YES |
Quantity |
The number of packages or boxes for the specified SKU and type. | 2 |
| YES |
Weight (Kilograms) |
The product weight to override the default weight during packaging. | 5 |
| YES |
Height (Centimeters) |
The packaging height to customize the dimensions for packaging. | 50 |
| YES |
Width (Centimeters) |
The packaging width to customize the dimensions for packaging. | 30 |
| YES |
Length (Centimeters) |
The packaging length to customize the dimensions for packaging. | 20 |
After mapping the fields from the CSV file to the platform, click the "Submit Mapped Data" button at the bottom of the page to complete the process.
Importing Batching Numbers
The batching numbers feature allows you to create batches of products with specific expiry dates, which proves particularly useful for managing inventory that includes perishable items such as food. During the order despatch process, the system automatically selects products from the batch based on the first expiry date, adhering to the "First In, First Out" (FIFO) principle. It ensures that products with earlier expiry dates are despatched first, reducing the risk of items expiring before being sold.
Choose the "Batching Numbers" import type in the designated section to begin the import process. Here is an empty file containing all the necessary headers to facilitate your customisation. Fill in the required details according to your specific needs.
Below is an explanation of the headers that should be included in the batching numbers CSV file:
| Compulsory Header | Header | Header Description | Example Input |
|
YES |
SKU |
The "SKU" field represents the Stock Keeping Unit, which is a unique identifier for each product in the inventory. |
Demo-SKU-1 |
|
YES |
Location ID |
This field indicates the unique identifier (ID) of the specific location where the batch is stored. Location IDs can be obtained from the "Locations" page under the warehousing section. |
Location-04 |
|
YES |
Location Name |
The "Location Name" field provides a human-readable name for the storage location associated with the batch. |
Aisle-5 |
|
YES |
Batch Number |
Each batch of products is assigned a unique "Batch Number" to distinguish it from other batches. |
Batch-2 |
|
YES |
On Hand | The "On Hand" field denotes the number of products available in the batch. | 20 |
|
YES |
Expire Date (Format: YYYY-MM-DD) |
This field indicates the expiry date associated with the products in the batch. It is crucial to maintain FIFO orders during dispatch. |
2023-07-27 |
After mapping the fields from the CSV file to the platform, click the "Submit Mapped Data" button at the bottom of the page to complete the process.
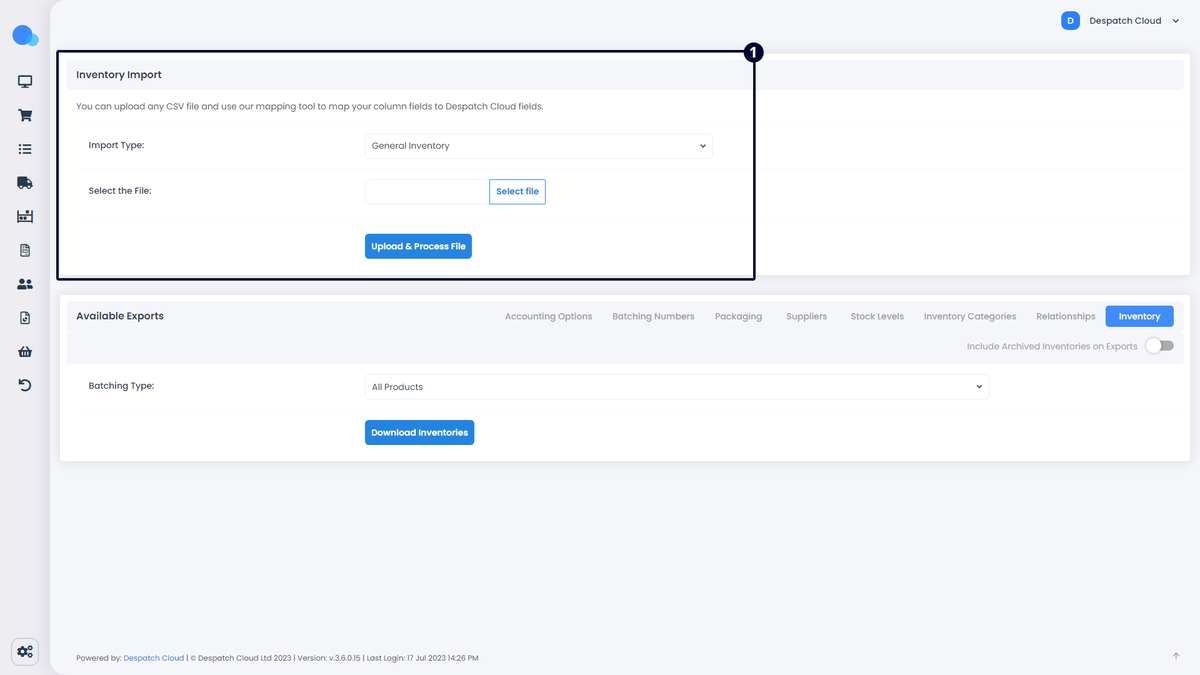
Exporting
In the Import/Export section of the Inventory page, you will find the exporting feature located at the bottom side of the page. Through tabs, you can easily export various sections of the platform. Depending on the section you select, additional dropdown options may be available, allowing you to filter the information you wish to export.
With a simple click of the blue "Download" button, you can immediately download the CSV file of the selected sections. This convenient export option enables you to efficiently back up and modify your data, providing you with seamless control over your inventory information.
